Introducción a la herramienta de correspondencias
Tabla de contenido
Introducción a la herramienta Correspondencias
La herramienta Correspondencias es tan flexible que puede usarla para administrar casi cualquier comunicación que desee elevar fuera de su correo electrónico para mantener en su sistema formal de registro De Procore.
A continuación, se presentan algunas ideas sobre lo que puede hacer con la herramienta Correspondencias, en función de cómo la utilizan nuestros clientes actuales.
|
|
|
|
|
|


Configuración
Para comenzar a utilizar la herramienta Correspondencias en sus proyectos, el administrador de la compañía primero debe crear uno o más tipos de correspondencia a nivel compañía.
Para aquellos que no tengan permisos de administrador a nivel compañía: si desea comenzar a utilizar la herramienta correspondencias, hable con el administrador de Procore de su compañía y consulte las listas anteriores para ideas.
Pasos para administradores:
Lo primero es lo primero: la herramienta Correspondencias es diferente a cualquier otra herramienta de Procore. Mientras que la mayoría de las herramientas de Procore se aplican a un proceso de negocio específico, como las solicitudes de información (request for information, RFI), y vienen con plantillas previas con conjuntos de campos configurables asociados, por ejemplo, todas las RFI tienen campos de "persona asignada" y "fecha de vencimiento", la herramienta Correspondencias está abierta para que la configure. Al configurar un nuevo tipo de Correspondencias para su compañía, básicamente está creando una "herramienta de Procore personalizada" desde cero, lo que incluye decidir qué campos de datos se asociarán con ella. Eso significa que hay un par de pasos de configuración iniciales involucrados.
Tenga en cuenta que Procore proporciona las siguientes plantillas prediseñadas para tipos de correspondencia:
- Apéndice
- Boletín
- Solicitud de Cambio
- Instrucción del cliente
- Restricciones
- Aviso de advertencia temprana
- Extensión del tiempo
- Correspondencia general
- Lecciones aprendidos
- Cartas
- Cartas de intención
- Solicitud de Material
- Plan de mitigación
- Aviso de retraso
- Aviso para proceder
- Notificación de sobreprecio
- Solicitud de permiso
- Solicitud del proyecto
- Identificación de riesgo
- Instrucción de la obra
Puede encontrar las plantillas prediseñadas en la herramienta de Administrador a nivel compañía.Consulte Agregar un tipo de correspondencia de plantilla.Estas plantillas son una forma fácil de comenzar con la herramienta Correspondencias - luego, cuando esté listo para crear sus propios tipos de correspondencia, siga los pasos a continuación.
A continuación, cubrimos los pasos recomendados para configurar nuevos tipos de correspondencia para sus equipos. Puede crear varios tipos de correspondencia para su compañía, las siguientes instrucciones lo guiarán a través de la configuración de un tipo de correspondencia.
Crear un tipo de Correspondencia
Aspectos a tener en cuenta
- El nombre que le dé al tipo de correspondencia debe describir claramente su uso previsto (algunos ejemplos se muestran en las listas anteriores). El tipo es lo primero que verán los equipos del proyecto cuando inicien una nueva correspondencia dentro de un proyecto, por lo que debe elegir un nombre para ese tipo que reconozcan y comprendan.
- Recomendación: Defina un prefijo dentro del nombre del Tipo de correspondencia, que los equipos del proyecto puedan entender y reconocer fácilmente. Esto facilitará que los equipos del proyecto reconozcan rápidamente el tipo de correspondencia cuando lo utilicen en la anotación de plano o lo vinculen a otras herramientas.
- Los permisos se aplican a nivel de tipo y se basan en plantillas (generalmente por rol, dentro de la herramienta Permisos a nivel compañía). Por lo tanto, considere quién deberá ver y usar este tipo de correspondencia y crear tipos separados para adaptarse a las comunicaciones con audiencias separadas (por ejemplo, un aviso general a una subcontratista sería un tipo separado que un aviso general para un propietario). Consulte Correspondencia: permisos para obtener más información.
- Recomendación: Seleccione "privado por defecto" cuando cree el Tipo de correspondencia. Debido a que los permisos de correspondencia se basan en roles, este paso garantizará que solo las partes específicas (p. ej., un subcontratista en particular) puedan ver las correspondencias asignadas o distribuidas a ellos (en lugar de todos los subcontratistas). (Por el contrario, si la intención del tipo de correspondencia es transmitir información a todos los miembros de un rol de proyecto en particular [p. ej., los subcontratistas], entonces deberá anular la selección de la opción “privado por defecto”).
- El tipo de correspondencia también aparece en su propia línea en el gráfico de vista general del proyecto, en la página de inicio del proyecto. De esta forma, puede realizar un seguimiento de los estatus de los ítems dentro de cada tipo de correspondencia.
- Si su compañía utiliza una herramienta personalizada (creada por el equipo de Soluciones personalizadas de Procore ), no puede tener tipos de correspondencia que coincidan con los nombres de las herramientas personalizadas. Si desea utilizar un tipo de correspondencia que ya está asociado con una herramienta personalizada, le recomendamos que cambie el nombre de la herramienta personalizada.
Pasos
Crear y aplicar un conjunto de campos configurables
Cosas para considerar
- En este paso, está decidiendo qué información (o campos de datos) se asociarán con este tipo de correspondencia. Los campos que agregue dictarán qué información recopilarán los equipos del proyecto "en la naturaleza" cuando utilicen este tipo de correspondencia en un proyecto real. Por ejemplo, ¿este tipo de correspondencia necesita una fecha de vencimiento, un campo adjunto o un lugar para documentar el impacto de los costos?
- Puede marcar campos como "obligatorios", "opcionales" u ocultarlos por completo.
- Puede agregar campos personalizados para personalizar aún más el conjunto de campos configurables.
- Puede crear varios conjuntos de campos configurables diferentes para un tipo de correspondencia determinado, para adaptarse a las variaciones en las necesidades de datos para diferentes tipos de proyectos.
Pasos
Una vez que haya creado el tipo de correspondencia, puede terminar de crear el conjunto de campos configurables para el tipo de correspondencia.
Actualizar la configuración del conjunto de campos configurables
Comience en el paso 6 a continuación:
- Navegue hasta la herramienta Administrador a nivel compañía.
- En "Configuración de la herramienta", haga clic en la herramienta para la que desee crear conjuntos de campos configurables.
- Haga clic en la pestaña Conjuntos de campos configurables .
Nota: Las herramientas sin otras configuraciones en la herramienta de Administrador a nivel compañía se abrirán automáticamente en esta página. - Haga clic en Crear nuevo en la sección para la que desea configurar los conjuntos de campos.
- En la ventana "Crear conjunto de campos configurables", ingrese un nombre para el conjunto de campos y haga clic en Crear.
- En la página 'Editar conjunto de campos configurables', cada nombre de campo tiene las siguientes opciones:
- Haga clic en el botón para alternar a la posición ENCENDIDO
 para hacer que el campo sea visible en la sección.
O
Haga clic en el botón para alternar a la posición APAGADO para ocultar el campo en la sección.
Nota: Un icono indica que el campo está visible de forma predeterminada y no se puede cambiar a oculto.
 - Marque la casilla de verificación 'Obligatorio' para designar el campo como obligatorio.
O
desmárquela para designar el campo como opcional.
Notas:- Los campos sin un casilla de verificación son opcionales de forma predeterminada y no se pueden cambiar a obligatorios.
- Una casilla de verificación marcada en gris
 indica que el campo es obligatorio de forma predeterminada y no se puede cambiar a opcional.
- Haga clic en el botón para alternar a la posición ENCENDIDO
- Haga clic en Guardar.
- En la ventana "¿Aplicar cambios a [#] proyecto(s)?", haga clic en Asignar proyectos para agregar el conjunto de campos configurables a los proyectos.
- En la ventana 'Asignar proyectos', marque la casilla de verificación junto a cada proyecto al que desee aplicar el conjunto de campos configurables y haga clic en Actualizar.
- En la ventana "¿Aplicar cambios a [#] proyecto(s)?", haga clic en Confirmar.
- Opcional: para establecer un conjunto de campos configurables como predeterminado para nuevos proyectos, haga clic en el ícono
 al final de su fila en la pestaña "Conjuntos de campos configurables" y seleccione Establecer como predeterminado de nuevos proyectos.
Nota:
Los proyectos creados a partir de una plantilla de proyecto que incluye conjuntos de campos heredarán los conjuntos de campos de la plantilla del proyecto en lugar de los conjuntos de campos predeterminados de su compañía. Consulte Configurar una plantilla de proyecto.
Opcional: Agregar un campo personalizado al conjunto de campos configurables
Comience en el paso 3 a continuación:
- Haga clic en la pestaña Conjunto de campos.
- Haga clic en Editar junto al conjunto de campos al que desea agregar los campos personalizados.
O
Haga clic en Crear nuevo para crear un nuevo conjunto de campos. Ver Crear nuevos conjuntos de campos configurables. - Opcional: Agregue el campo a una sección personalizada. Consulte Crear secciones personalizadas y ¿Qué son las secciones personalizadas y qué herramientas de Procore los admiten?
- Desplácese hacia la parte inferior de la página y haga clic enAgregar campo personalizado.
- Haga clic en Crear nuevo.
- Complete la siguiente información para el nuevo campo:
- Nombre del campo: Ingrese un nombre para el campo.
- Tipo de campo: Seleccione el tipo de campo que desea crear.
Nota: Es posible que algunos tipos de campo no estén disponibles para todas las herramientas.Expandir o contraer opciones de tipo de campo
- Casilla: El campo será una casilla de verificación que se puede marcar o borrar.
- Empresa: El campo será un menú desplegable que permitirá a los usuarios seleccionar una compañía del Directorio del proyecto.
- Fecha: El campo permitirá al usuario seleccionar una fecha de calendario.
- Cargas de archivos: El campo permitirá que se agreguen archivos adjuntos desde herramientas compatibles en Procore o en la computadora del usuario.
- Ubicación: El campo será un menú desplegable que permitirá a los usuarios seleccionar una ubicación existente.
- Selección múltiple: El campo será un menú desplegable que permitirá a los usuarios seleccionar varios valores.
- Número: El campo permitirá ingresar un valor de número.
Nota: Cuando un usuario ingresa un número en un campo personalizado de "Número" sin valor decimal o con dos ceros después de un punto decimal, las exportaciones de PDF con el campo mostrarán un valor decimal de .0 para el número. Por ejemplo, si un usuario ingresa 123 o 123.00, la exportación de PDF mostrará el número como 123.0. - Texto sin formato (corto): El campo será un campo de texto libre.
- Usuario del directorio del proyecto (selección múltiple): El campo será un menú desplegable que permitirá a los usuarios seleccionar uno o más usuarios del Directorio del proyecto.
- Usuario del directorio del proyecto (selección única): El campo será un menú desplegable que permitirá a los usuarios seleccionar un usuario del Directorio del proyecto.
- Entrada de solo lectura: El campo le permitirá escribir un mensaje, como instrucciones, en el cuadro de texto, que será visible en un ítem.
- Texto enriquecido (largo): El campo será un campo de texto enriquecido que admite párrafos para permitir respuestas más largas y texto en negrita, cursiva y subrayado.
- Selección única (desplegable): El campo será un menú desplegable que permitirá a los usuarios seleccionar un valor.
- Usuario de la herramienta (selección única): El campo será un menú desplegable que permitirá a los usuarios seleccionar un usuario con permisos de "Solo lectura" o superiores para la herramienta.
- Fecha/Hora: El campo será una combinación de un menú de calendario y una hora de entrada del día.
- Para los tipos de campos Selección múltiple y Selección única, complete los siguientes pasos para agregar opciones:
- Haga clic en Agregar opciones.
- Ingrese la opción en el campo.
- Para cada opción adicional necesaria, haga clic en Agregar opción e ingrese la opción.
- Haga clic en Guardar opciones.
- Haga clic en Listo.
- Haga clic en Crear y el campo se agregará automáticamente a la parte inferior de la conjunto de campos configurables.
- Haga clic en el botón para colocarlo en la posición ENCENDIDO posición para hacer que el campo personalizado sea visible en la sección, o haga clic en la posición para ocultar el campo personalizado.
- Si el campo personalizado debe ser obligatorio, marque la casilla de verificación "Obligatorio". De lo contrario, el campo será opcional.
- Haga clic en Guardar.
- Si el conjunto de campos ya está aplicado a uno o más proyectos, haga clic en Aplicar a existente.
O
Si acaba de crear un nuevo conjunto de campos, haga clic en Asignar proyectos y comience en el paso 3 de la sección Aplicar un conjunto de campos con campos personalizados a proyectos a continuación. - Opcional: Haga clic y arrastre el icono de agarre
 reordenar para reorganizar el orden en que aparecerán los campos personalizados en un conjunto de campos.
Nota: Los campos estándar de Procore no se pueden reordenar.
Opcional: Agregar una sección personalizada al conjunto de campos configurables para organizar campos personalizados
Comience en el paso 5 a continuación:
- Navegue hasta la herramienta Administrador a nivel Compañía.
- En "Configuración de herramientas", haga clic en la herramienta para la que desea crear un campo personalizado.
- Haga clic en Conjuntos de campos configurables.
- Haga clic en Editar junto al conjunto de campos configurables al que desea agregar la sección personalizada.
O bien:
Haga clic en Crear nuevo para crear un nuevo conjunto de campos configurables. Consulte Crear nuevos conjuntos de campos configurables. - Haga clic en +Agregar sección.
- En la ventana "Agregar sección", ingrese un nombre para la sección y haga clic en Agregar.
- Para agregar uno o más campos personalizados a la nueva sección personalizada, haga clic en Agregar campo personalizado debajo del nombre de la sección personalizada.
- Haga clic en Elegir entre los existentes para agregar un campo personalizado existente.
O bien:
Haga clic en Crear nuevo para crear y agregar un nuevo campo personalizado. Consulte Crear campos personalizados dentro de un conjunto de campos configurables. - Repita los pasos 5 a 8 para agregar más secciones personalizadas.
- Opcional: para reorganizar las secciones personalizadas, siga estos pasos:
- Pase el cursor junto a la sección personalizada hasta que aparezca el icono de agarre .
- Haga clic en el icono de agarre y arrastre la sección personalizada arriba o debajo de otra sección personalizada.
- Pase el cursor junto a la sección personalizada hasta que aparezca el icono de agarre
- Opcional: para mover un campo personalizado a una sección personalizada diferente, siga estos pasos:
- Coloque el cursor junto al campo personalizado hasta que aparezca el icono de agarre .
- Haga clic en el icono de agarre y arrastre el campo personalizado sobre el botón Agregar campo personalizado a la sección personalizada a la que desea moverlo.
- Coloque el cursor junto al campo personalizado hasta que aparezca el icono de agarre
- Haga clic en Guardar .
Termine de crear su conjunto de campos configurables y aplíquelo a proyectos
-
Una vez que haya agregado uno o más campos personalizados al conjunto de campos, haga clic en Guardar.
- En la ventana "¿Aplicar cambios a [#] proyecto(s)?":
Importante
La herramienta Correspondencias no se mostrará en un proyecto hasta que se haya creado al menos un tipo de correspondencia y se haya aplicado al menos un tipo de correspondencia al proyecto.- Haga clic en Aplicar a existente para guardar sus cambios en el conjunto de campos configurables en proyectos a los que ya se ha aplicado el conjunto de campos configurables.
O - Haga clic en Asignar proyectos para agregar o eliminar el conjunto de campos configurables de los proyectos.
- En la ventana 'Asignar proyectos', marque la casilla de verificación junto a cada proyecto al que desee aplicar el conjunto de campos configurables y haga clic en Actualizar.
- En la ventana "¿Aplicar cambios a [#] proyecto(s)?", haga clic en Confirmar.
- Haga clic en Aplicar a existente para guardar sus cambios en el conjunto de campos configurables en proyectos a los que ya se ha aplicado el conjunto de campos configurables.
- Opcional: Para establecer un conjunto de campos configurables como predeterminado para nuevos proyectos, haga clic en el icono al final de su fila en la pestaña "Conjuntos de campos configurables" y seleccione Establecer como predeterminado de nuevo proyecto.
Ajustar permisos
Aspectos a tener en cuenta
- La configuración de permisos para la correspondencia se basa en plantillas (generalmente según el rol) y se maneja en la herramienta Permisos a nivel de compañía.
- Cada tipo de correspondencia tiene su propio conjunto de permisos, al igual que cualquier otra herramienta de Procore. La configuración de permisos incluye Ninguno, Solo lectura, Estándar, Administrador y permisos granulares.
Pasos
- Navegue hasta la herramienta Permisos de la compañía.
- Haga clic en la pestaña Plantillas de permisos de proyecto.
- Haga clic en Acciones junto a la plantilla para la que desea otorgar permisos granulares y seleccione Editar plantilla.
- Desplácese hasta la sección "Tipos de correspondencia y herramientas personalizadas".
- Seleccione el botón en la columna Ninguno, Solo lectura, Estándar o Administrador en la fila para cada tipo de correspondencia.
- Haga clic en el ícono de escuadra angular > para abrir o cerrar el menú de permisos granulares de cada tipo de correspondencia.
Nota: este ícono solo se muestra cuando se selecciona Solo lectura o Estándar. - Marque la casilla de verificación "Activar TODO" para habilitar todos los permisos granulares de la herramienta Correspondencias en la plantilla de permisos.
Nota: El nombre de esta casilla de verificación cambia a "Desactivar TODO" si todos los permisos granulares de la herramienta de correspondencia están habilitados.
O
Marque la casilla de verificación para cada permiso granular que desee habilitar en la plantilla de permisos.
- Haga clic en Guardar.
Configurar opciones avanzadas en un proyecto
Hay configuraciones adicionales que puede configurar para cada tipo de correspondencia a nivel proyecto. Puede utilizar estas configuraciones para:
- Habilitar recordatorios por correo electrónico para ítems vencidos
- Definir una lista de distribución predeterminada
- Establecer fechas de vencimiento de respuesta automáticas
- Agregar una descripción predeterminada
Pasos
Configuración de pestaña
- Navegue hasta la herramienta Correspondencias del proyecto.
- Haga clic en el ícono Configurar ajustes
 y seleccione el tipo de correspondencia para el que desea configurar los ajustes.
 - Haga clic en Configuración de pestaña en la barra lateral.
- Complete lo siguiente según sea necesario para su proyecto:
Nota: Los usuarios que crean o editan un ítem de correspondencia utilizando este tipo de correspondencia pueden cambiar los campos Distribución, Fecha de vencimiento y Descripción de ítems individuales.- Distribución predeterminada: Seleccione uno o más usuarios o grupos de distribución en el menú desplegable. Haga clic en el
 icono junto al nombre de un usuario si desea eliminarlo de esta lista.
Nota: Los usuarios deben tener permisos de nivel "Solo lectura" o superior en el tipo de correspondencia que se agregará a esta lista. Consulte Otorgar permisos granulares en una plantilla de permisos de proyecto. - Las respuestas vencerán: ingrese un número para los días laborables predeterminados después de los cuales se vencerá una respuesta.
- Descripción predeterminada: Ingrese una descripción predeterminada para agregar a los ítems creados utilizando este tipo de correspondencia.
- Configuración de correo electrónico: Marque o desmarque las casillas de verificación debajo de cada rol de usuario para determinar quién recibirá las notificaciones por correo electrónico de cada evento de correo electrónico. Consulte ¿Quién recibe correos electrónicos de ítems de correspondencia y notificaciones push? para obtener más información.
Nota: Algunas configuraciones de correo electrónico se configuran a nivel compañía y afectan a todos los proyectos. Por ejemplo, el casilla de verificación "Enviar recordatorios por correo electrónico para ítems vencidos" se describe en Crear un nuevo tipo de correspondencia.Importante
Si se utiliza un flujo de trabajo de autoservicio de correspondencia personalizada en un proyecto, las notificaciones por correo electrónico de ítems de correspondencia para ese proyecto se administran a través de los ajustes de configuración del flujo de trabajo en su lugar. Consulte (Beta) ¿Cuándo se envían notificaciones por correo electrónico para flujos de trabajo personalizados de autoservicio? para obtener más información
- Distribución predeterminada: Seleccione uno o más usuarios o grupos de distribución en el menú desplegable. Haga clic en el
- Haga clic en Actualizar para guardar sus cambios.
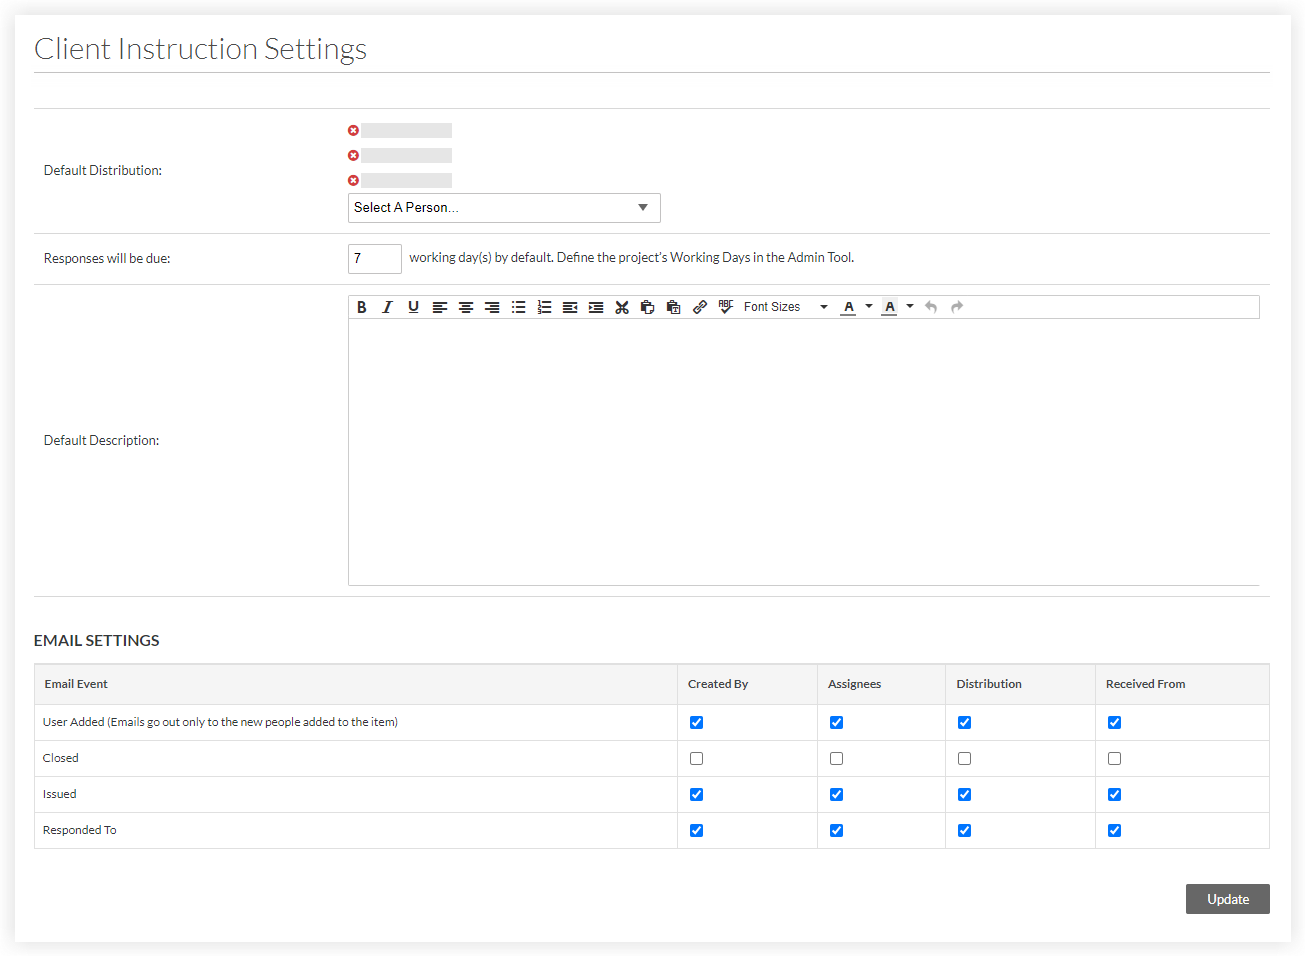
Tabla de permisos
- Navegue hasta la herramienta Correspondencias del proyecto.
- Haga clic en el ícono Configurar ajustes y seleccione el tipo de correspondencia cuyos permisos de usuario desea ver.
- Haga clic en la Tabla de permisos de la barra lateral.
Se mostrará la tabla Permisos de usuario para el tipo de correspondencia.- El icono de
 marca de verificación verde indica el nivel de permiso que se le ha otorgado al usuario en el tipo de correspondencia: "Ninguno", "Solo lectura", "Estándar" o "Administrador".
 - El icono rojo
 indica qué niveles de permisos no están asignados al usuario.
 - El ícono gris
 indica qué niveles de permisos no están asignados al usuario y no se pueden cambiar actualmente, ya que al usuario se le asignó una plantilla de permisos de proyecto. Para cambiar sus permisos en la herramienta Directorio a nivel de proyecto, consulte Cambiar los permisos de un usuario en el Directorio del proyecto.
Recomendación
Consulte Matriz de permisos de usuario - Web y Matriz de permisos de usuario - Móvil para obtener más información sobre las diferentes acciones que pueden realizar los usuarios con el nivel de permiso que seleccione.
- El icono de
- Para cambiar el nivel de permiso de un usuario en el tipo de correspondencia cuando no tiene una plantilla de permisos del proyecto asignada, haga clic en el icono rojo para el nivel de permiso que desea otorgar al usuario.
El icono rojo se reemplaza por el icono de marca de verificación verde y el nivel de permiso del usuario al tipo de correspondencia se guarda automáticamente.
Mejores prácticas
Planificación
Debido a que Correspondencias es tan flexible, es importante tener un plan integral por adelantado para que pueda asegurarse de que lo está utilizando de la manera eficiente que mejor se adapte a las necesidades de sus equipos.
Aspectos a tener en cuenta
- Encuestar a las partes interesadas internas. Puede crear varios tipos de correspondencia: asegúrese de haber recibido la entrada de los equipos sobre los que son más críticos o beneficiosos para sus proyectos.
- Identifique los procesos que encajan bien. Para un proceso determinado, si responde "sí" a las preguntas siguientes, es probable que la correspondencia sea una buena opción.
- ¿Este proceso se basa en compartir información y comunicarse con otras partes interesadas? ¿Necesita que las partes interesadas sean responsables de recibir o responder a esta información?
- ¿Este proceso se está manejando actualmente por correo electrónico o incluso por teléfono/mensaje de texto?
- ¿Beneficiaría a su compañía formalizar y centralizar la comunicación en torno a este proceso?
- ¿Existe el riesgo de perder tiempo o dinero si este proceso no se rastrea o registra correctamente?
- ¿Tiene plantillas existentes que utiliza para este proceso?
- ¿Actualmente está completando este proceso fuera de Procore o dentro de una de las herramientas personalizadas de Procore?
- ¿Es necesario vincular este proceso a las RFI y los eventos extraordinarios para un seguimiento y seguimiento completos?
- ¿Se beneficiaría este proceso de estar vinculado a una anotación de plano?
- Evalúe el panorama general. Diseñe su plan para los tipos de correspondencia y sus datos asociados, para asegurarse de que está utilizando la correspondencia de manera eficiente, sin redundancia y de una manera que tenga sentido para sus equipos y procesos.
Implementación
El despliegue y la adopción exitosos requieren que los equipos se unan y comiencen a utilizar la nueva funcionalidad. Eso significa que las personas deben conocer la funcionalidad, sus expectativas de uso y dónde acudir para obtener ayuda y comentarios.
Aspectos a tener en cuenta
- Socializar. Asegúrese de que los equipos del proyecto conozcan los tipos de correspondencia que ha configurado y aclare las expectativas para el uso de la correspondencia. Haga anuncios amplios y brinde oportunidades para preguntas y respuestas (idealmente, más de una vez). Actualice los manuales de procedimientos de la compañía en consecuencia.
- Tren. Si sus equipos necesitan capacitación sobre correspondencias, dirijalos al sitio de soporte de Procore o al icono de ayuda en la aplicación, a la página de seminarios web o trabaje con su punto de contacto de Procore para solicitar capacitación personalizada.
- Recopile comentarios. Mantenga una línea de comunicación abierta con los equipos del proyecto para que pueda obtener información directa sobre lo que está funcionando bien o dónde posiblemente deba realizar ajustes.
- Utilice reportes y tableros. Supervise el número y el estado de las correspondencias en todos los proyectos, de modo que pueda identificar áreas para mejorar la adopción, aclarar expectativas o realizar cambios en sus plantillas.