Objetivo
Crear un transmittal utilizando la herramienta Transmittals del proyecto.
Fondo
Con la herramienta Transmittalts del proyecto, puede crear un registro de la información del proyecto que se ha enviado a otros por fax y canales de envío. Cuando crea un transmittal y envía una copia por correo electrónico a sus destinatarios, toda la información se captura y almacena con su proyecto Procore, incluidos los nombres del remitente, el destinatario y las fechas relevantes. Por ejemplo, quizás el sistema de correo electrónico de un usuario no funcione y la única forma de enviar una respuesta oficial sea por fax o por teléfono. En tales casos, querrá crear un transmittal para realizar un seguimiento de la correspondencia, por lo que un registro histórico está disponible para fines de auditoría en Procore.
Aspectos a tener en cuenta
- Permisos de usuario requeridos:
- Para crear permisos de nivel de transmisión, 'Estándar' o 'Administrador' en la herramienta Transmittals del proyecto.
- Para ser agregado a los campos "Para" o "Cc" en un transmittal, el usuario debe agregarse al Directorio del proyecto. Consulte Agregar una cuenta de usuario al directorio de proyectos.
Pasos
Crear un transmittal
- Navegue hasta la herramienta Transmittals del proyecto.
- Haga clic en Crear.

- Continúe con estos pasos:
Agregar información general a el transmittal
- Desplácese hasta Información general.
- Complete el ingreso de datos de la siguiente manera:
-
Number: Procore automatically assigns numbers to new transmittals in sequential order. You may change this number as desired.
-
Subject: A descriptive subject for the transmittal.
-
To: Select people or distribution groups from the project's Directory. This action assigns the transmittal to the named individuals. If you choose to click the Create and Email button (or 'Save and Email' if you are an 'Admin' user editing an existing transmittal), the system will automatically email a notification about the transmittal to the recipients.
-
CC: Select people or distribution groups from the project's Directory. This action carbon copies the transmittal to the named individuals. If you choose to click the Create and Email button (or 'Save and Email' if you are an 'Admin' user editing an existing transmittal), the system will automatically email a notification about the transmittal to the recipients.
-
Sent Via: Select Attached to attach an item from Procore to the transmittal or Under Separate Cover. If you select Under Separate Cover, you can also select one of these options: Email, US Mail, Hand Delivery, FedEx, UPS, DHL, Express Mail, Fax, and Other.
-
Private: Mark this checkbox to hide the transmittal from everyone except 'Admin' level users, designated users in the 'To' and 'Cc' fields, and members of the default distribution group (see Configure Advanced Settings: Transmittals).
-
Submitted For: Mark the checkboxes that correspond to the reason the transmittal is being submitted. You have these choices: Approval, Your Use, As Requested, Review and Comment, or Further Processing.
-
Action as Noted: Mark the checkboxes that correspond to the desired action. You have these choices: Out for Signature, Approved as Submitted, Approved as Noted, Submit, Resubmitted, Returned, Returned for Corrections, Resubmit, Due By, Received, Received as Noted, and Sent Date. (Note: It is recommended that you work with your project's management to define the proper use for each of these default actions in your environment).
- Continúe con Agregar elementos al Transmittal.
Agregar items al transmittal
- En la página Nuevo transmittal, desplácese hacia abajo hasta el área Items.
- Seleccione un elemento de la lista desplegable Formato.
Notas:
- Puede agregar varios items a un transmittal.
- Al agregar ítems a un transmittal, el sistema le permite adjuntar varios archivos a la vez para estos formatos: documentos, planos, impresiones, muestras y planos de taller. Consulte ¿Cómo adjunto varios archivos a la vez a un transmittal?
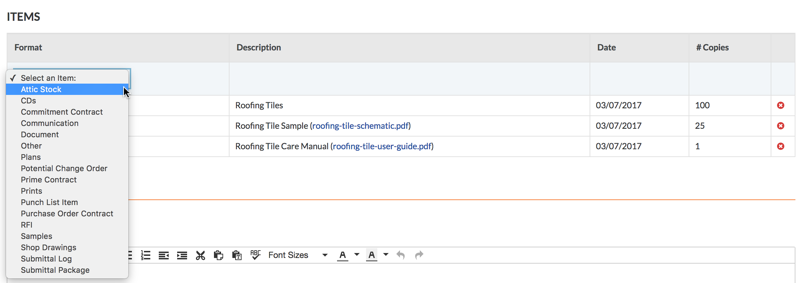
Según las herramientas de Procore que estén habilitadas en su entorno, puede tener estas opciones:
-
Attic Stock: Select this option to create a transmittal for any attic stock Then enter a description, select a date from the calendar, and enter the number of copies.
-
CDs: Select this option to create a transmittal for a compact disc. Then enter a description, select a date from the calendar, and enter the number of copies.
-
Commitment Contract: Select this option to create a transmittal for subcontract (see Create a Subcontract). Next, select a subcontract from the Description list, the date of the subcontract is captured automatically, and then enter a number of copies.
-
Communication: Select this option to create a transmittal for an email message in the project's Emails tool.
-
Document: When you select this option, the system prompts you to select a document from the project's Documents tool.
-
Other: To create a different type of submittal, select this option. Then enter a description, select a date from the calendar, and enter a number of copies.
-
Plans: Select this option to create a transmittal for any construction plans. Then enter a description, attach any files to the item, select a date from the calendar, and enter a number of copies.
-
Potential Change Order: When you select this option, the system prompts you to select a potential change order from the project's Prime Contracts tool.
-
Prime Contract: When you select this option, the system prompts you to select a contract line item from the project's Prime Contracts tool.
-
Prints: Select this option to create a transmittal for prints. Next, enter a description of the print(s), attach a file of the print, select a date from the calendar, and enter a number of copies.
-
Punch List Item: When you select this option, the system prompts you to select a punch list item from the project's Punch List tool.
-
Purchase Order Contract: Select this option to create a transmittal for a purchase order (see Create a Purchase Order). Then select a purchase order from the Description list, the system sets the date automatically, and enter a number of copies.
-
RFI: When you select this option, the system prompts you to select an RFI from the project's RFIs tool.
-
Samples: Select this option to create a transmittal for a sample. Then type a description of the sample, attach a file to the item, select a date from the calendar, and enter a number of copies.
-
Shop Drawings: Select this option to create a transmittal for shop drawing. Then type a description of the shop drawing, attach a file to the item, select a date from the calendar, and enter a number of copies.
-
Submittal Log: Select this option to create a transmittal for a submittal. Then select a submittal from the Description list and specify the number of copies.
-
Submittal Package: When you select this option, the system prompts you to select a submittal package from the project's Submittals tool.
- Haga clic en Agregar .
Nota: Si adjuntó varios archivos al transmittal, cada archivo se agrega como una partida independiente.
- Repita los pasos anteriores para agregar partidas adicionales.
La siguiente ilustración muestra un ejemplo de un área de Ítems completada.
Nota: El sistema NO le permite editar ítems existentes. Si necesita corregir un elemento, haga clic en la 'x' ROJA para eliminarlo. A continuación, vuelva a añadir el elemento.

- Continúe con Agregar comentarios al Transmittal.
Agregar comentarios al transmittal
- En la página Nuevo transmittal , desplácese hasta el área Comentarios.
- Escriba cualquier información adicional sobre el transmittal en el cuadro Comentarios.
- Continúe con Crear o Crear y enviar el Transmittal.
Crear o crear y enviar el transmittal
- Desplácese hasta la parte inferior de la página Nuevo transmittal.
- Elija entre estas opciones:
- Para crear el transmittal sin enviar un correo electrónico a las personas enumeradas en los campos "Para" y "CC", haga clic en Crear.O bien:
- Para crear el transmittal y enviar una notificación por correo electrónico a las personas enumeradas en los campos "Para" y "CC", haga clic en Crear y enviar por correo electrónico .
Notas : Después de crear un transmittal, el sistema hace visibles las pestañas Ítems relacionados, Correos electrónicos e Historial de cambios. La pestaña Correos electrónicos brinda a los usuarios la capacidad de reenviar un transmittal a otros miembros del equipo del proyecto. Consulte Reenviar un transmittal por correo electrónico.